


Rapid Gram Stain
Table of Contents
Introduction:
The Gram stain technique, initially developed by Danish physician Hans Christian Gram in 1884, has played a pivotal role in microbiology. This method allows for the categorization of bacteria into two primary groups: Gram-positive and Gram-negative, based on their distinctive cell wall characteristics. This blog post will explore the fundamental principles, key components, step-by-step procedure, result interpretation, and important precautions associated with the Rapid Gram Stain method.
Principle of Gram Stain
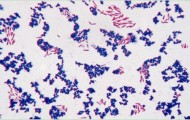
Gram staining helps scientists sort bacteria into two main groups: Gram-positives and Gram-negatives. It’s all because of the bacteria’s unique cell walls. Gram-positives have strong cell walls that trap a purple dye, making them look purple under a microscope. Gram-negative have thinner cell walls, so the purple dye washes away, and they appear red.
Key Components of Rapid Gram Stain
The Rapid Gram Stain procedure encompasses several sequential steps:
- Crystal Violet: This is basically purple dye mixed with some ethanol.
- Iodine Solution: It’s made from iodine and potassium iodide.
- Decolorizer: A mix of acetone and ethanol.
- Safranin Solution: This one has safranin (a reddish dye), fuchsin basic, and ethanol.
Sample Requirements
When preparing a bacterial smear for Gram staining, careful attention is crucial. The smear should be thin and even. Natural drying and gentle heat fixation are recommended, ensuring the glass slide’s back feels warm rather than hot.
Step-by-Step Staining
Now, let’s dive into the staining adventure:
- Purple Time: Apply Crystal Violet for 10 seconds, rinse gently with water, and shake off any extra water.
- The Iodine Magic: Spread Iodine Solution for 10 seconds, rinse gently with water, and get rid of excess water.
- Decolorizer: Add Decolorizer for 10-20 seconds, rinse gently with water, and shake off excess water.
- Red Showdown: Counterstain with Safranin Solution for 10 seconds, rinse gently.
- Patience Is Key: Let the smear air-dry, and then it’s time to peek under the microscope.
Result Interpretation
- Gram-positive organisms will exhibit a purple hue.
- Gram-negative organisms will appear red.

Method Limitations
False negatives may arise when dealing with aged specimen smears.
Precautions
- Staining time may vary based on specimen type and smear thickness.
- In the event of Decolorizer depletion, acetone can serve as a suitable substitute.
- For specific cases, adjust Safranin staining to enhance contrast.
- Properly store reagents, avoiding exposure to extreme temperatures and direct sunlight.
- In colder temperatures, consider extending the staining duration.
- Caution against overly thick smears and excessive heat fixation.
- Reserve the use of this technique for trained professionals with result interpretation skills.
- Thoroughly review the instruction manual before utilization.
- Comply with established waste disposal guidelines.
- Verify production details, including the expiration date, on the packaging.
- Company Profile: Click Here
- Related Product: Click Here.
- BASCO: Click Here.